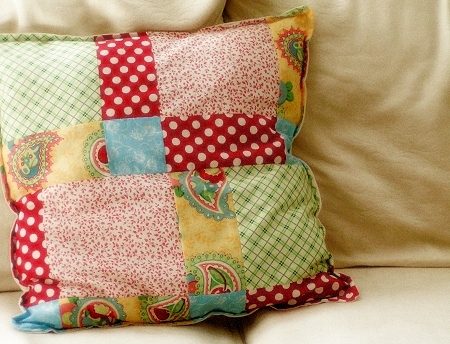
It’s been awhile since I’ve shared a tutorial. This one adds a splash of color without a lot hassle. You can make a whimsical disappearing nine-patch pillow for your child’s room or your sofa in no time flat and it’s a great project for beginners. If you’re still learning to sew in a straight line, this patchwork pattern is pretty forgiving. Please note that all seam allowances are 1/4″.
1. Select your fabrics. I chose five contrasting cotton prints for the front and a white cotton for the back.
2. Cut out 9 squares. Mine are 6″ x 6″.
3. Arrange your squares however you like. Keep in mind that the square in the very center will be split into four pieces. The ones in each of the four corners will remain whole.
4. Stitch the squares together in strips of three. (You’ll have three strips of three squares). Press seams flat.
5. Stitch the three strips together. Now you have one large patchwork square. Press the seams flat.
6. Cut your square into four equal parts.
7. Rearrange the parts until you get the desired effect.
8. Stitch the four parts together and press the seams flat.
9. Lay the backing fabric on top of the patchwork square, right sides facing.
10. Stitch around the edge, leaving 3″ opening for turning.
11. Turn right side out and stuff with polyfill.
12. Top-stitch all the way around the pillow, 1/4″ from the outside edge, to secure the layers and seal the opening.
13. Lay down and take a nap.
Thank you for the warm reception at Solstice Letters yesterday. I’m there again today. If you’d like to contribute photos for the project, all the details are there.


So simple and yet so sweet! I am doing a 12-week sewing class for the teenage daughter of a friend, and we will definitely be making one of these! Thanks for the tutorial!
That’s wonderful, brite. I’m glad you can use it!
thanks for this encouragement to sew…I think I need a simple project like this to get me moving again. It is nice to see it laid out like this because the effect looks much more complicated.
blessings~
I was wondering how you made that sweet pillow. Thank you for sharing another great tutorial.
you made that seem so easy. thank you. this is my type of project.
Gina…this is wonderful…I’m nominating you by the way for the RIKRAK Olympics handmade blog award…you’re always so real and love your homemades.
HUGS
Char
Wow! What an honor. Thank you so much!!!
No problem…
Char
Oh…I forgot…here’s the link….good luck!!!
http://rikrakstudio.blogspot.com/2010/01/2010-handmade-olympics.html
Char
this is great!!
so funny, I just made one of these for my daughter last week! I really like the fabrics in yours. I also like to use the dis. 9 patch for my quilted notebooks.
Love this…didn’t really know how easy this was…I am so trying this.Thank you for sharing this with us!
Oh I love this. I need to make myself a few pillows for our kitchen window bench, and I see one of these sitting up there. I love the way that you use your graphics. Really neat
Thanks! I am making a patchwork blanket for a friend this weekend and am going to use your method on a larger scale. I’ll post photos when done.
Thanks so much for sharing this! i recall seeing it a while ago but i couldn’t remember the details. your pillow is beautiful and i LOVE the idea behind the solstice letters.
Love the tutorial and the green plaid you used in your pillow!
THAT is cute! How easy too. Baby quilt coming up here at this house and now I have an easy template. Thanks for putting this together and sharing with us.
our living room is in need of some sprucing up. this is going on the to-do list!
I’m going to make one of these…like tonight! Thanks!
What a great idea! I need some pillows for the couch. I might just try this with some scraps I have left over from my couch quilt and a little bit of corduroy.
Thanks for sharing the how-to.
I hope you have a great day and all is going well with your shop!
What a beautiful idea Gina! I love the layout that you used, really pretty.
Awesome! Thank you so much! Is that officially a “disappearing 9 patch?”
I love how this takes all the guesswork out of it. Thanks so much for sharing, I’ll be linking.
What a great tutorial! Thanks for sharing. As soon as my house is pieced back together I’m going to fill it with lots of hand made goodness, so some of these pillows are on my list. Thanks again,
sara
So, so cool. Love the fabrics! Thanks for the tutorial!
Wow, thank you for this! I just got a sewing machine, am very new to sewing, and was looking for a project that didn’t sound intimidating to start with – and I think I’ve found it!!! I’m off to find fabric now!
[…] a great patchwork pillow tutorial on bright and blithe. […]
[…] patchwork pillow case* […]
I made one today..yay!!..Thanks a lot for the tute http://www.flickr.com/photos/31252262@N05/4601001953/
[…] Patchwork Pillow Tutorial […]